Saturday 23 September 2017

Sunrise, sunset...

The 1920's and 30's saw the height of Art Deco style. It swept away the flowing organic shapes of Art Nouveau and in it's place brought strong geometric and streamlined shapes. A classic motif of this period was the sunrise, with it's bold and energising design it was often used in front doors. The large panel below was made for a stairwell in a house with many Art Deco features...

Vintage glasses are particularly good to use in a panel like this as the deep cut of their pattern lights up in sunlight and at different times of the day! Here are rays are placed alternately with a sparkle / matt effect.

Choosing glasses.

Clear glasses used included Spectrum Cord, Glistre (small), Corella, Pilkingtons Hammered no. 2 & 3, old Flemish (large and small), Ripple, Sparkle, Morocco (large), Seedy Wissmach, Kokomo, Antique Cathedral, Arctic (original version, large and small), Festival, Stippolyte (original version) and Spotlyte. Coloured glasses include Arctic (pale and dark amber), English Muffle, Artista (pale and dark amber), it's this glass creating the 'scribble' effect in the border glasses.

Some neat reflections!

More examples of the sunrise and Art Deco themes can be found on my website here and more about old glasses here.

Thursday 21 September 2017

Mackintosh Inspiration.

The creative mind of Charles Rennie Mackintosh has left a lasting legacy. I often get asked for panels in the style of Rennie Mackintosh and it is always a pleasure to create them. Below is an internal fanlight for a bright spot between 2 rooms...

Choosing glasses, looking at options...

Leading up.


Panel detail showing assorted decorative glass features.


Photo courtesy of Jim Barber.
The panel in situ.

More examples of Mackintosh style work can be found on my website here.

Old Marylebone Town Hall

Recently received some lovely photos from Juliette Doyard, of Hall Conservation of the completed work at Old Marylebone Town Hall (to see how the building looked before click here ).

Spandrels completed by Apollo Stained Glass. Beautiful metal work restored by Hall Conservation.


Glass advice to obscure lift shaft all metal work beautifully restored by Hall Conservation.
A new lease of life for the old building as London Business School.


The Goddess of Wine

Recent work includes a fanlight panel showing the Goddess of Wine relaxing in a garden inviting you to join her, kick off your shoes and enjoy a large glass of wine...


Glasses include a mix of handmade and machine made glasses with small jewels for the necklace. Here the panel is on the window sill awaiting fitting.

There's gold in those there rosebuds, being 'true pink' glass!

An assortment of glasses make up the grapes.

The face was given a twinkle in the eyes and inviting look by Flora Jamieson 
The background glass is Waterglass and it's undulations mean that the glass is very changeable at different times of the day and from different angles.


Photo courtesy of Pauline Cross.
 The glass in situ.

Slow down and enjoy!

Wednesday 20 September 2017

Replacing cracked panes...

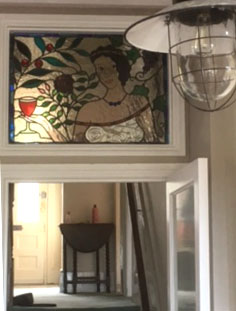
I made this front door panel back in 2011 but recent building works led to the door being slammed and various cracks (marked with red dots) occurred. Shaped cracks can be tricky to replace on site and with some particularly complicated shapes this panel needed to be removed and worked on flat on the bench.  


Identify which shapes need replacing - repairs can be expensive and if just a tail end is broken it may be fine with a bridge of lead (or strap) across. This piece has a crows foot crack and the lead would need to be too wide visually to cover it. First tallow your joints.

Remove the existing solder with a hot iron - preferably gas, brushing the joints with a close haired nylon brush.

Removing the solder allows you to cut the joints with a sharp knife which will allow you to lift the leaf of the lead more fully. Remove the cement with a sharp pick - a dental pick is good!

Brush some oil onto the leads with light engine oil or similar. This is not so useful for newer leads but for older more brittle leads it helps to make them more malleable.

Lift up the leaf of the lead (on the cracked pane side) with an oyster knife using the existing glass as leverage.

Use the outline of the upturned leaf to mark your new piece. It's best to make the mark just short of the edge of the leaf, that way you cut the glass a bit smaller and you do not have to do a lot of grozing. Though the panel was not made that long ago the new stock of the background glass has changed a lot being much less seedy and clearer. Luckily I had just enough old stock to cover the more damaged pieces.  

Cut away the old glass, scoring the cracked pane and tapping out gently.

Drop the new piece in.

Flatten the leads with a Fid or Larikin. Wire brush. Resolder joints.

Tape the piece in place so that it is centred and any gaps are covered. Where there are multiple replacements recementing is best to reseal the whole panel and make it watertight. 

Panel cemented and polished before refitting. Because an important feature of this panel is its being symmetrical with the matching opposite piece having a single line crack (and to reduce costs in taking the single line cracked piece out) it was necessary to strap the unbroken piece. Other small straps were added to 'tail end' pieces that were broken and the other more noticeable cracks replaced.

Monday 18 September 2017

Please wait while your system updates...

Just realised how long it's been since I last updated the blog so here's one of a few updates to follow...!

Beautiful original Victorian hand spun roundels 

Repairs and matching to hand blown background glass.

New work using vintage glasses for an Art Deco house.


Rebuild / repairs work matching up old glasses.

Replace cracked panes and remake as hanging panels 


Repairs and restoration work at Whitehall Court.

Matching old glasses for a mirrored panel in a front door.